Skip to content
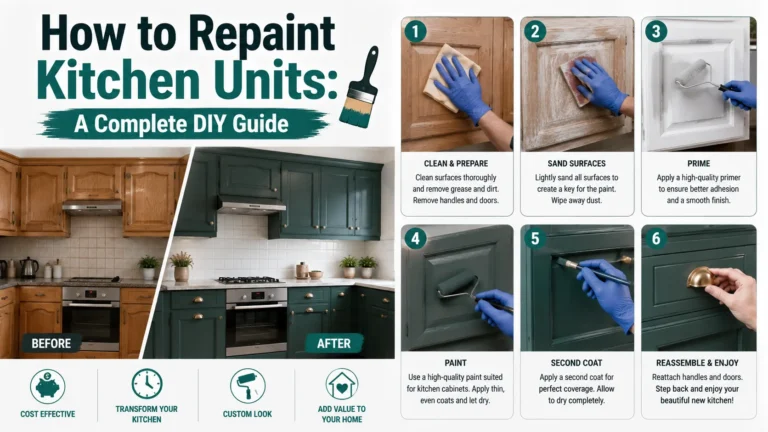
Repainting kitchen units is one of the easiest ways to give an old kitchen a completely different personality without ripping everything out and starting again. If your cupboards are structurally sound but the colour looks dated, the finish has become tired, or you simply want a brighter and more modern room, a good paint job can make an enormous difference.
The important part is understanding that painting kitchen units is not quite the same as painting a bedroom wall. Kitchen cupboards are constantly touched, opened, closed, exposed to cooking grease, moisture and cleaning products, so the coating needs to adhere properly and withstand everyday wear.
Current guidance from major paint manufacturers consistently puts surface preparation at the centre of a successful cabinet makeover: remove hardware, clean away grease, prepare the surface, use an appropriate primer where required, and allow each coating to dry properly before moving to the next stage.
The good news is that you do not necessarily need specialist equipment to achieve an attractive result. A screwdriver, degreaser, suitable sandpaper, quality primer where needed, cabinet paint, brushes and a small roller can take you a long way.
The trick is to slow down during preparation rather than trying to finish everything in one afternoon. Think of the existing cabinet surface as the foundation of a house: if the foundation is dirty, glossy, greasy or damaged, a beautiful topcoat will not magically solve the problem.
A well-prepared surface, by contrast, gives your paint something reliable to grip. Whether you have timber doors, MDF units, laminate cabinetry or previously painted cupboards, this guide explains how to repaint kitchen units step by step, what materials to choose, which mistakes to avoid and how to create a finish that looks considerably more professional than a rushed DIY job.

Why Repainting Kitchen Units Is Worth It
The biggest advantage of repainting kitchen units is the visual transformation you can achieve without replacing the entire kitchen. Cabinet doors occupy a huge amount of visual space, so changing their colour can alter the atmosphere of the room almost immediately. Dark brown cupboards can become soft white, dated cream can become contemporary grey, or plain white units can be transformed with a deep blue, green or charcoal shade. You can also use different colours on wall and base units to create a more intentional, designer-style appearance. Instead of treating your kitchen as a collection of separate cupboards, repainting gives you an opportunity to make the whole room feel connected. This is particularly useful when the worktops, appliances and cabinet boxes are still perfectly serviceable but the overall design feels stuck in another decade.
There is also a practical reason to repaint rather than replace. If the doors and cabinet frames are solid and the hinges, shelves and internal structure remain functional, throwing everything away can be unnecessary.
A fresh finish can hide minor cosmetic wear, update the colour and make the room feel cleaner and better maintained. Dulux describes cabinet painting as a way to refresh a kitchen while avoiding the expense and disruption associated with a full replacement. The key distinction is between cosmetic problems and structural problems.
Paint can improve scratches, faded finishes and outdated colours, but it cannot repair swollen chipboard, badly damaged doors, broken cabinet boxes or serious water damage. Inspect everything before buying paint. If the units are fundamentally sound, repainting can be a smart project; if they are falling apart, replacement or professional renovation may make more sense.
How Much Difference Paint Can Make
A kitchen makeover does not always require dramatic construction. Sometimes the colour is the missing ingredient. Imagine wearing the same furniture in a room for ten years and then suddenly changing the walls, lighting and accessories. The furniture would appear different even though you had not replaced it. Kitchen cabinets work in much the same way. Their colour interacts with the flooring, worktop, backsplash, walls, handles and natural light, so changing the cabinet finish can alter the entire visual balance of the room.
Light colours can make cabinetry feel more open and airy, while darker shades can create a richer and more dramatic atmosphere. A satin or semi-gloss finish can also make the units easier to wipe clean, although the exact sheen should always be selected according to the paint manufacturer’s recommendations.
The quality of the transformation, however, depends heavily on execution. A professional-looking finish is rarely created by simply brushing paint directly over the existing cupboards. Grease, fingerprints, old polish, cooking residue and glossy coatings can interfere with adhesion. Behr specifically recommends cleaning and scuff-sanding glossy previously painted surfaces, while Sherwin-Williams emphasises clean, dry and properly prepared surfaces before priming.
That is why repainting kitchen units is best approached as a preparation project followed by a painting project. If you spend most of your time getting the surface ready, the actual painting becomes much easier. The paint then becomes the finishing layer rather than the thing trying to hide every problem underneath it.
Can You Paint Any Type of Kitchen Unit?
Most common kitchen cabinet materials can be painted, but they do not all require exactly the same preparation. Solid wood is generally straightforward because it can be cleaned, lightly sanded, repaired and coated with a suitable primer and paint system.
MDF can also produce excellent results, although its exposed edges and routed details need careful attention because they can absorb coatings differently from sealed surfaces. Laminate and melamine units are more challenging because they often have very smooth, non-porous faces.
That does not mean they are impossible to repaint. It means adhesion becomes especially important, so cleaning, scuffing and choosing a suitable bonding primer can make the difference between a coating that stays put and one that begins peeling around handles and edges after regular use.
Before committing to the entire kitchen, identify what material you actually have. Open a cupboard door and inspect its edge. Look underneath shelves and around damaged areas. If the surface looks like a thin decorative layer over a manufactured board, treat it differently from solid timber.
Behr’s current guidance specifically notes that laminate and melamine can be painted when they are cleaned, scuff-sanded and primed appropriately because their smooth surfaces require preparation for proper adhesion. If you are unsure, perform a small test in an inconspicuous area.
A successful test should not simply look attractive immediately after painting; it should also show reasonable adhesion once the coating has dried. That small experiment can save you from spending days repainting a kitchen only to discover that the chosen system does not bond properly.
Wood, MDF, Laminate and Melamine
Wooden kitchen units often provide the greatest flexibility because the surface can be prepared mechanically and repaired before painting. Existing varnish, stains or old paint should still be dealt with properly, especially if the coating is glossy or deteriorating. MDF is similarly workable, but attention should be paid to damaged edges and previously exposed areas. Laminate and melamine require more care because the surface is designed to be hard and resistant, which is useful for a kitchen but less helpful when you want paint to adhere.
A suitable bonding primer can provide an intermediate layer between the original surface and the decorative topcoat. Sherwin-Williams recommends testing primer adhesion on an inconspicuous section before proceeding with the full application, which is a sensible approach when working with unfamiliar surfaces.
There is no universal rule that every cabinet needs the same number of primer coats or exactly the same sanding schedule. Paint manufacturers formulate products differently, and some specialist cupboard paints are designed to be self-undercoating or to work without a separate primer on suitable surfaces. Dulux, for example, states that its Simply Refresh product can be applied without primer under the specified conditions, while its broader cabinet guidance says primer may be required depending on the surface and chosen paint.
Therefore, do not follow a random internet recipe blindly. Read the technical instructions for the specific product you are using. The best cabinet painting system is the one in which the existing surface, primer and topcoat are compatible with each other.
Tools and Materials You Will Need
Getting everything together before you start makes the project considerably less frustrating. At minimum, you will want a screwdriver or drill for removing handles and hinges, masking tape, dust sheets, cloths, a suitable degreaser or strong detergent, sandpaper or sanding sponges, filler for minor imperfections, primer where required, cabinet or furniture paint, a good brush and a small high-quality roller. Dulux, Behr and Benjamin Moore all recommend combinations of these basic preparation and application tools in their current cabinet-painting guidance.
A paint tray is useful for roller application, while labelled bags or containers can keep screws and hardware organised. If your kitchen contains glass panels, masking tape can protect them during preparation and painting.
You may also want to create a dedicated drying area. A pair of trestles, a clean workbench or a suitable flat surface can give doors somewhere safe to dry horizontally. This matters because freshly painted doors are vulnerable to dust, fingerprints and accidental contact.
If you have many doors, number each one with removable tape and record which opening it belongs to. This sounds boring until you are standing in front of twenty nearly identical doors wondering which hinge belongs where.
Professional results are often created by small organisational habits rather than expensive equipment. If you are using a paint sprayer, remember that spraying requires appropriate ventilation, masking and overspray control. Benjamin Moore recommends responsible sprayer use and notes that spraying is best performed in a suitable controlled environment such as outdoors or a garage.
Step 1: Remove Doors, Drawers and Hardware
Start by removing the cabinet doors and drawers whenever practical. Take off handles, knobs and other removable hardware rather than trying to paint around them. Removing these components gives you better access to edges and prevents paint from building up around hardware. Put screws, hinges and handles into labelled containers or bags so reassembly is straightforward. If several doors look identical, number them discreetly on the back with removable tape. Current cabinet-painting instructions from Behr and Sherwin-Williams both begin with removing doors, drawers and hardware before surface preparation.
Once the removable pieces are out of the way, inspect the cabinet frames. Decide whether you are painting only the doors and drawer fronts or the entire visible cabinetry. Painting just the fronts can dramatically change the appearance, but leaving heavily contrasting frames may produce a mismatched result. On the other hand, painting every internal surface can add considerable work and drying time.
There is no rule that says you must paint everything. Decide what needs changing based on visibility, wear and the overall design you want. Protect worktops, floors, appliances and walls with dust sheets and masking materials before cleaning and sanding begin. A little preparation at this stage prevents a great deal of cleanup later.
Step 2: Clean and Degrease the Kitchen Units
Cleaning is one of the most important steps in the entire process. Kitchens accumulate a thin layer of grease and cooking residue that may not always be visible. Your cupboards can look clean while still carrying enough contamination to interfere with paint adhesion. Dulux recommends cleaning cabinets with sugar soap or a strong detergent solution, while Behr recommends cleaning the cabinet surface before sanding.
Use an appropriate degreaser according to the manufacturer’s instructions, then remove residue with a clean damp cloth where required. Allow the units to dry completely before continuing.
Do not make the common mistake of thinking that sanding will remove the need for cleaning. Sanding a greasy surface can simply spread contamination around or drive it into small imperfections. Imagine trying to stick a sticker onto an oily table: scratching the table first does not solve the oil problem. The same basic principle applies to cabinet paint.
The surface needs to be clean, dry and appropriately prepared before you expect a coating to adhere reliably. Once the cleaning stage is complete, inspect the doors under good lighting. If you can still see grease, dirt, wax or loose coating, deal with it before moving on. This is one of those jobs where patience pays dividends later.
Why Cleaning Matters More Than You Think
Paint failure is often blamed on the paint when the real problem happened before the paint was opened. Peeling, bubbling and poor adhesion can result from grease, dust, moisture or glossy residue remaining on the surface. Behr specifically identifies poor surface preparation as a common reason cabinet paint peels or bubbles. That is why cleaning should not be treated as a quick wipe before the “real work.” It is part of the real work. Every cabinet door you prepare properly increases the chance that your final finish will remain attractive through everyday opening, closing and cleaning.
After cleaning, give the surface enough time to dry. Pay particular attention to corners, routed profiles, screw holes and joints where water or cleaning solution can remain. If the kitchen is humid, drying may take longer. Do not rush simply because the surface looks dry from a distance.
Once dry, run your hand over the surface to check for obvious residue or rough contamination, then move on to repairs and sanding. Remember that preparation is cumulative: cleaning removes contamination, repairing fixes defects, sanding improves the surface profile, and priming can improve adhesion and coverage where appropriate. Each stage solves a different problem.
Step 3: Repair Chips, Cracks and Imperfections
Before applying paint, repair visible damage. Small dents, old handle holes, scratches and minor chips can often be filled with an appropriate filler before sanding smooth. This is particularly important if you are changing the handles because the new hardware may not cover the old holes.
Fill them carefully, allow the filler to dry according to the product instructions and sand the repaired areas until they blend with the surrounding surface. Dulux recommends filling imperfections and then sanding the repaired areas before painting.
Do not expect paint to behave like body filler. A thick layer of paint might visually soften a tiny imperfection, but it will not reliably disappear a deep dent or damaged edge. In fact, glossy new paint can make defects more noticeable because the fresh surface catches light.
Take a moment to inspect each door from different angles. Side lighting is particularly useful because it reveals scratches and dents that disappear when you look straight at the surface. Once repairs have been sanded, remove all dust before continuing. If the cabinet has severe swelling, delamination or structural damage, pause before painting and decide whether that component needs replacement or specialist repair.
Step 4: Sand the Kitchen Units
Sanding creates the surface condition your primer or paint needs to grip. You do not necessarily need to remove every trace of the old finish; the goal is generally to create an appropriately prepared surface while smoothing imperfections and reducing excessive gloss. Behr recommends 150–220 grit sandpaper in its cabinet guide, while Norton recommends a heavier initial sanding followed by a finer final pass depending on the existing finish. The exact grit should therefore depend on the coating and manufacturer’s recommendations. Work methodically rather than aggressively. You want a consistent surface, not gouges.
Pay attention to edges and corners because these areas are especially vulnerable to paint buildup and later wear. On detailed doors, a sanding sponge can be easier to control than a rigid sanding block. Once sanding is complete, remove all dust using an appropriate clean cloth or dust-removal method. Dust left behind can become tiny bumps trapped beneath your new finish. Norton also recommends a lighter fine sanding between coating stages to help create a smooth result. Think of sanding as polishing the runway before the plane lands: the better the surface underneath, the better the final result looks.
What Sandpaper Grit Should You Use?
There is no single grit that is perfect for every kitchen cabinet. A previously painted glossy surface may require more aggressive scuffing than a lightly finished timber surface, while delicate veneer should be treated carefully to avoid sanding through the decorative layer. Behr’s guidance points toward 150–220 grit for cabinet preparation, whereas Norton describes 120 grit for painted cabinets followed by a 220-grit finishing pass.
The sensible approach is to start with the least aggressive method that achieves the required surface preparation. If the gloss remains strong, increase the preparation carefully rather than immediately attacking the surface with very coarse paper.
After sanding, wipe away the dust thoroughly. Never assume that because you cannot see dust in the room there is none on the cabinet. Fine sanding particles can settle into profiles, corners and edges. A clean surface allows primer or paint to form a continuous film instead of trapping debris. If you discover areas where the old coating is loose or peeling, remove the loose material and prepare that section properly rather than simply painting over it. The objective is not merely to make the cupboard look dull; it is to create a stable surface that the next coating can bond to.
Step 5: Apply the Right Primer
Primer can be extremely useful when repainting kitchen units, particularly when you are changing materials, covering stained wood, painting laminate or melamine, or working with a surface where adhesion is uncertain. However, primer requirements depend on the specific paint system. Some specialist cabinet paints are designed to be self-priming or self-undercoating on suitable surfaces. Dulux, for example, says its Simply Refresh product does not require primer, while its general kitchen cabinet guidance says a wood or melamine primer may be appropriate depending on the surface and selected paint.
When primer is required, apply it evenly rather than creating a thick layer. Follow the manufacturer’s drying and recoat instructions, then inspect the surface. Sherwin-Williams recommends allowing its primer to dry properly before fine sanding, while Benjamin Moore recommends a bonding primer for suitable cabinet surfaces, particularly where strong adhesion is needed. A light sanding after primer can help remove tiny roughness before the finish coats, provided the product instructions permit it. Do not rush from primer directly into painting just because the surface feels dry to your fingertip. Dry-to-touch and ready-for-recoat are not always the same thing.
Step 6: Choose the Best Paint for Kitchen Units
Kitchen cupboards need a coating designed to tolerate regular handling and cleaning. Standard wall emulsion is generally not the first choice for a hard-wearing cabinet surface because cabinets experience a very different type of wear. Specialist cupboard, cabinet, door and trim enamels are formulated for this kind of application. Dulux highlights durable cupboard paints and satinwood products for kitchen applications, while Behr recommends cabinet, door and trim enamel for properly prepared cabinet surfaces. Benjamin Moore similarly recommends products intended to provide furniture-like finishes for cabinetry.
Sheen is another consideration. Satin and semi-gloss finishes are popular because they provide a balance between appearance, durability and cleanability. Gloss can create a striking appearance but tends to highlight surface imperfections, so preparation becomes even more important. Your choice should also match the existing kitchen design. If the worktops are heavily patterned, a calmer cabinet finish may create better balance.
If the kitchen is minimalist, a stronger colour can become the feature. Always follow the paint manufacturer’s instructions for compatible primers, number of coats, drying times and cleaning requirements. The best product is not necessarily the most expensive one; compatibility and correct application matter just as much.
Step 7: Paint the Cabinet Frames
Once the preparation is complete, begin with the cabinet frames. Use a quality angled brush for corners, edges and detailed sections, then use a small roller for larger flat areas where appropriate. Sherwin-Williams recommends using a brush for recessed or detailed areas and a mini roller for flatter sections. Work in manageable sections and avoid loading the brush or roller with excessive paint. Thick application can create runs, drips and uneven drying, while repeatedly brushing a section as the paint starts to set can introduce texture.
Pay attention to the order in which you paint. Working from less visible or recessed sections toward the more prominent flat areas can make it easier to maintain a consistent appearance. Keep a wet edge where possible so adjoining sections blend naturally.
Do not repeatedly go back over a section simply because you can still see a slight brush mark while the paint is wet. Some cabinet paints are designed to flow and level as they dry. Overworking them can create more marks rather than fewer. Your objective is controlled, even coverage rather than trying to make one coat look perfect.
Step 8: Paint the Doors and Drawers
Cabinet doors deserve extra attention because they are the most visible parts of the kitchen. Place them flat on a clean, stable surface where possible. Painting horizontally can make it easier to control runs and allows the coating to settle evenly, although the manufacturer’s instructions should always take priority. Start with detailed or recessed areas using a brush, then move onto larger flat sections with a suitable roller. Sherwin-Williams recommends precisely this type of brush-and-mini-roller approach for cabinet doors.
Do not paint the door edges so heavily that the coating begins to accumulate along them. Excess paint can interfere with door alignment and cause sticking once the cabinet is reassembled. Use consistent strokes and avoid repeatedly passing the roller over areas that have begun to dry.
If the doors have a wood grain, applying paint in the appropriate direction can help maintain a natural appearance; Behr specifically advises following the direction of the wood grain. Once the first coat is complete, leave the doors undisturbed until the product’s specified recoat time has passed.
Brush vs Roller vs Paint Sprayer
Each application method has advantages. A brush is excellent for detailed profiles, corners and narrow edges, but brush marks can become visible on broad flat panels if the paint is not designed to level well or if the application is overworked. A small roller can provide a more consistent finish across flat surfaces and is often a practical choice for DIY projects. A sprayer can produce a very smooth factory-style appearance, but it requires proper setup, masking, ventilation and technique. Benjamin Moore notes that spraying can be an efficient option but should be done responsibly in an appropriate environment.
For many homeowners, the best compromise is a quality brush plus a fine-finish mini roller. This combination is affordable, relatively easy to control and does not require learning spray equipment. Whatever method you choose, test it on one door first. Look at the result once it has dried, not just while it is wet. Paint can change appearance as it dries, and tiny application marks can become more or less noticeable depending on the sheen and lighting. If the test door looks good after drying, continue with the same technique throughout the kitchen.
Step 9: Apply the Second Coat
The second coat is where the finish usually starts to look complete. Do not assume that a thick first coat is better than two controlled coats. Multiple appropriately applied coats can provide better coverage and a more uniform finish than trying to achieve everything at once. Behr recommends considering a second coat for richer, more consistent colour, while Dulux’s cabinet guide instructs users to allow the first coat to dry before applying the second.
Before applying the second coat, inspect the first. If the surface contains tiny rough particles or minor imperfections, a very light fine sanding may help, provided your paint system allows it. Remove all resulting dust before recoating. Keep your application consistent with the first coat and resist the temptation to correct every tiny visual variation while the paint is wet. The finish needs time to settle. If you notice a drip, deal with it according to the product’s instructions rather than aggressively brushing it while partially dried. A calm, controlled second coat is usually much better than frantic touch-ups.
Step 10: Allow the Paint to Cure Properly
Dry does not always mean fully cured. This is one of the most important concepts to understand when repainting kitchen units. A cabinet may feel dry to the touch while the coating underneath is still developing its final hardness.
If you reinstall doors too quickly, close them tightly or place heavy objects against freshly painted surfaces, you can create sticking, marks or other defects. Norton notes that complete drying can take longer depending on weather and climate and recommends waiting before reinstalling cabinets. Benjamin Moore similarly includes a dedicated curing stage in its cabinet-painting process.
Follow the manufacturer’s stated drying and curing times rather than relying on guesswork. Temperature, humidity, ventilation, coating thickness and product chemistry can all influence drying. During this period, keep doors in a clean, protected location and avoid stacking them directly against one another.
Once the coating has cured sufficiently, reinstall the doors and hardware carefully. Do not slam freshly painted cupboards during the first few days simply because they are technically usable. Treat the new finish gently while it reaches its intended hardness.
Common Kitchen Cabinet Painting Mistakes
One of the biggest mistakes is skipping cleaning because the cupboards “look clean.” Another is sanding too aggressively and damaging veneer or creating deep scratches that become visible beneath the new finish. Painting directly over glossy laminate without suitable preparation is another common problem.
Other mistakes include applying excessively thick coats, using unsuitable wall paint, failing to allow adequate drying time and reinstalling doors before the coating has properly cured. Manufacturer guidance repeatedly emphasises preparation, correct product selection and controlled application for these reasons.
Another surprisingly common mistake is trying to complete the entire kitchen in a single rushed session. Cabinet painting is a process with natural waiting periods. Cleaning needs drying time. Primer needs drying time. Paint needs recoat time. Final curing needs additional patience. Trying to eliminate these stages is like trying to bake bread by turning the oven temperature dramatically higher and expecting the inside to finish instantly.
You might get something that looks finished from the outside, but the result will not be reliable. Build your schedule around the product instructions and give yourself enough time to do each stage properly.
How to Get a Smooth Professional Finish
A professional-looking finish begins before the first coat of paint. Smooth repairs, controlled sanding, thorough dust removal and appropriate primer selection all reduce the amount of texture that can appear in the final coating. Use good-quality application tools and avoid overloading them.
When working on flat surfaces, a fine-finish roller can help reduce visible texture, while a good brush is useful for profiles and edges. Sherwin-Williams recommends combining an angled brush with a mini roller for cabinet doors, while Benjamin Moore similarly recommends rollers for accessible flat areas and brushes for difficult sections.
Lighting is another underrated factor. Paint in a well-lit area so you can see runs, missed sections and uneven coverage before the coating dries. However, do not confuse visibility with the need to constantly touch the paint. Once you have applied an even coat, leave it alone. Many DIY finishes become rough because the painter keeps returning to an area that has already started setting. Smoothness comes from the combination of preparation, product selection, application technique and drying, not from endlessly brushing the same wet surface.
Best Colours for Repainting Kitchen Units
Colour selection should begin with the kitchen elements you are keeping. Look at the worktop, flooring, backsplash, walls, appliances and natural light before choosing cabinet paint. If your worktop has strong patterns or warm tones, a neutral cabinet colour can create balance. White and soft off-white can make a compact kitchen feel bright, while greys can create a more contemporary appearance.
Green, navy and muted blue can add personality without necessarily overwhelming the room. If you want a two-tone design, consider keeping one colour on the base units and using a lighter shade on wall cabinets.
Do not choose a colour solely because it looks attractive on a phone screen. Lighting can dramatically change how a colour appears. Dulux recommends testing colour ideas using sample pots and viewing the dried colour in the actual kitchen environment.
This is particularly important because kitchen lighting may include daylight, ceiling lights and under-cabinet lighting, each of which can alter the perceived colour. Paint a sample board or piece of suitable material and leave it in the room at different times of day. The best cabinet colour is not necessarily the trendiest shade; it is the one that works with the room you actually have.
How to Maintain Newly Painted Kitchen Units
Once the kitchen is finished, maintenance becomes much easier if you treat the new coating sensibly. Clean painted cabinets with a soft cloth or sponge and an appropriate mild cleaning solution rather than abrasive pads that could damage the finish.
Behr specifically recommends mild soap and water and advises avoiding abrasive cleaners and scouring pads on painted cabinets. Wipe spills reasonably quickly, especially around cooking areas where oils and sauces can accumulate. Regular gentle cleaning is preferable to allowing a thick layer of grime to build up and then attacking it aggressively.
Pay attention to areas around handles because these receive the most contact from hands. If you notice a small chip or scratch, deal with it early rather than waiting for the damaged area to expand.
Avoid hanging heavy items from freshly painted doors or repeatedly slamming them. Your cabinets are still working furniture, not museum pieces, but a little care will help preserve the finish. The exact cleaning products and methods should always be compatible with the paint system you selected. When in doubt, consult the paint manufacturer’s maintenance instructions.
DIY vs Professional Kitchen Unit Painting
DIY cabinet painting can be rewarding when you have enough time, patience and a suitable working area. It can also become surprisingly demanding when the kitchen contains dozens of doors, intricate profiles, damaged surfaces or difficult laminate finishes. Professional painters can bring specialised equipment, controlled spray environments and experience with preparation and coating systems. The right choice therefore depends less on whether painting is technically possible and more on the finish you expect and the time you have available.
If you are comfortable with detailed preparation and do not mind a project that takes several days, DIY can be a worthwhile option. If the kitchen is expensive, the doors are complex, the surfaces are badly damaged or you need a highly uniform factory-style finish, professional cabinet painting may be the safer route.
Even when hiring someone, understanding the process helps you evaluate the work. Ask how they prepare the units, what primer and topcoat system they use, how they control dust and how long the doors remain off the cabinets. A professional result is not simply about spraying paint; it is about the entire preparation and finishing system.
Conclusion
Learning how to repaint kitchen units is really about learning how to prepare, apply and wait. The paint itself is only one part of the process. Start by inspecting the cabinetry and deciding whether repainting makes sense, then remove doors and hardware, clean away grease, repair imperfections, prepare the existing coating and select a compatible primer and cabinet paint. Apply controlled coats using the right tools, give each layer sufficient drying time and allow the finished coating to cure before putting everything back into heavy daily use. Current guidance from Dulux, Behr, Sherwin-Williams, Benjamin Moore and Norton all points toward the same fundamental principle: preparation and patience are central to a durable cabinet finish.
The most important thing to remember is that you do not need to rush. A kitchen makeover can feel exciting once the first coat starts going on, but the best results often come from the less glamorous stages: degreasing, sanding, repairing, removing dust and waiting. Think of every cabinet door as a small piece of furniture rather than simply another surface to paint. If you prepare it properly and use a coating designed for the demands of cabinetry, you can dramatically change the appearance of your kitchen while keeping the existing units. Whether you choose a timeless white, contemporary grey, deep green, navy blue or another colour entirely, careful preparation can turn tired cupboards into a fresh focal point.
FAQs
Can I repaint kitchen units without sanding?
Sometimes, depending on the existing finish and the paint system you choose. Some specialist cabinet paints are designed for reduced preparation, but glossy or smooth surfaces may still need scuffing or deglossing for reliable adhesion. Always follow the manufacturer’s instructions for your specific product.
What is the best paint for kitchen units?
A durable cabinet, cupboard, door or trim paint is generally a better choice than ordinary wall paint. Satin and semi-gloss finishes are popular because they can provide a practical balance between appearance and cleanability. Always check compatibility with your cabinet material and primer.
Do laminate kitchen units need primer?
Laminate and melamine surfaces generally benefit from thorough cleaning, scuff sanding and an appropriate bonding primer because their smooth surfaces can make adhesion difficult. Behr specifically recommends this preparation approach for laminate and melamine cabinets.
How many coats of paint should kitchen cabinets have?
The correct number depends on the specific paint, colour, substrate and coverage. Many cabinet systems use more than one finish coat for consistent coverage and durability. Follow the manufacturer’s stated recoat and coverage instructions rather than automatically applying very thick coats.
How long should painted kitchen units dry before reinstalling?
The answer depends on the product, temperature, humidity, and coating thickness. Do not rely solely on the surface feeling dry. Follow the manufacturer’s drying and curing instructions, and give the coating additional time before heavy use if recommended. Norton and Benjamin Moore both emphasise allowing sufficient time for drying and curing before reinstalling or heavily using cabinetry.