Skip to content

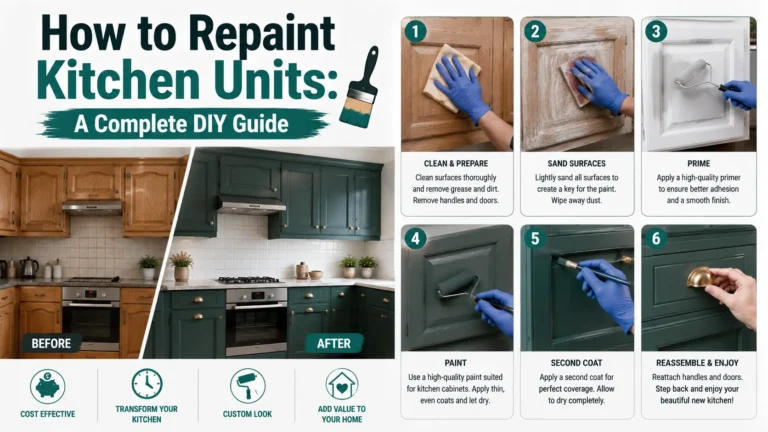
Repainting kitchen units is one of the most effective ways to refresh an old kitchen without removing everything and starting again. If your cupboards are structurally sound but the colour looks dated, the finish has become tired, or you want a more modern appearance, a fresh coat of suitable paint can make a significant difference.
However, painting kitchen units is not quite the same as painting a bedroom wall. Kitchen cupboards are opened, closed, touched, and cleaned regularly. They are also exposed to grease, moisture, and everyday wear. To achieve a smooth, durable finish, you need the right materials, careful preparation, and enough time for the paint to dry and cure properly.
At Sprayed Tech Solutions, we understand the importance of preparation when working towards a quality kitchen finish. One of the most common mistakes our team highlights is rushing the job, particularly when people paint cabinet doors while they are still attached or skip essential preparation.
This guide explains how to repaint kitchen units step by step, which materials to consider, how to avoid common mistakes, and when professional kitchen spraying may be worth considering.

Brush & Roller vs Spraying: Which Should You Choose?
When repainting kitchen units, one of the biggest decisions is choosing the right application method. Both brush-and-roller painting and professional spraying can refresh tired kitchen cabinets, but the finish, preparation, and time involved can differ considerably.
Brush and Roller Painting: A DIY-Friendly Option
Using a brush and roller is a practical choice if you’re working with a limited budget and don’t mind spending time on preparation and painting. It allows you to work at your own pace and is suitable for many DIY kitchen renovation projects.
However, brush marks, roller texture, and uneven coverage can be difficult to avoid, particularly on large cabinet doors and detailed surfaces. The final result depends heavily on preparation, paint selection, and application technique.
Professional Kitchen Spraying: A Smoother, Premium Finish
Professional kitchen spraying offers a different approach. With the correct preparation, suitable coatings and controlled application, spraying can create a smooth, consistent finish with minimal visible brush or roller texture.
It is particularly suitable for homeowners who want to transform their existing kitchen units without replacing the entire kitchen. Doors, drawer fronts, and other suitable surfaces can be prepared and sprayed to give the kitchen a fresh, coordinated appearance.
For a smooth, factory-style finish, professional kitchen spraying is an excellent premium option. It can save homeowners the hands-on work of a DIY project while delivering a more consistent appearance when carried out by an experienced professional.
The best choice depends on your budget, the condition of your cabinets, and the finish you want to achieve.
Why Repainting Kitchen Units Is Worth It
The biggest advantage of repainting kitchen units is the transformation you can achieve without replacing the entire kitchen.
Cabinet doors take up a considerable amount of visual space, so changing their colour can alter the appearance of the room. Dated brown cupboards can become soft white, cream units can be updated with contemporary grey, or plain cabinetry can be given more character with navy blue or green.
Repainting can also make sense financially when the existing cupboards, hinges and cabinet frames are still in good condition. Instead of paying to replace perfectly serviceable units, you can focus on improving their appearance.
However, paint cannot repair every problem. Swollen chipboard, severe water damage, broken cabinet boxes and badly damaged doors may require replacement or specialist repairs.
Before starting, inspect your kitchen carefully. If the units are structurally sound and the main issue is their appearance, repainting may be a practical option.
Can You Paint Any Type of Kitchen Unit?
Most common kitchen cabinet materials can be painted, but each surface may require a different preparation method.
- Solid wood: Can generally be cleaned, lightly sanded, repaired, and coated with a compatible primer and paint system.
- MDF: Can produce a good finish, although exposed edges and damaged areas need particular attention because they may absorb coatings differently.
- Laminate: Its smooth surface can make paint adhesion more challenging, so suitable preparation and compatible products are important.
- Melamine: May also require careful cleaning, scuff-sanding and a suitable bonding primer, depending on the chosen paint system.
Before buying materials, identify the material your kitchen units are made from. Check the edges of the doors and look for any peeling decorative layers or damaged areas.
If you are unsure how a particular surface will respond, test your chosen products in an inconspicuous area first.
Not every cabinet requires the same primer or sanding schedule. Some specialist cupboard paints are designed to be used without a separate primer on suitable surfaces. Always follow the instructions for the specific paint system you choose.
Tools and Materials You Will Need
Gathering your materials before starting will help you work more efficiently.
You may need:
- A screwdriver or drill for removing handles and hinges
- Dust sheets and masking tape
- A suitable degreaser or cleaning solution
- Clean cloths or sponges
- Sandpaper or sanding sponges
- Suitable filler for minor imperfections
- Primer, where required
- Cabinet, cupboard or furniture paint
- A quality angled brush
- A fine-finish mini roller
- Paint trays and protective equipment
- A clean, protected area for drying cabinet doors
If you are using a paint sprayer, you will also need appropriate masking, ventilation and overspray control.
The materials you need will depend on your cabinet surfaces, chosen products and application method. Check the manufacturer’s guidance before purchasing everything.
Step 1: Remove Doors, Drawers and Hardware

Start by removing cabinet doors and drawers wherever practical. Take off handles, knobs and removable hardware rather than trying to paint around them.
Removing the doors gives you better access to the edges and helps you work more consistently across the surface. It also reduces the risk of paint building up around handles, hinges and door joints.
From our experience, one of the most common DIY mistakes is trying to paint kitchen doors while they are still attached to the cabinets. When doors remain in place, reaching every edge becomes more difficult, and achieving an even finish can be challenging.
Working on removed doors makes preparation and painting easier to manage. It also gives you more control over how the paint is applied and how the doors are left to dry.
Before removing anything, label each door discreetly and keep the screws and hinges in separate, labelled bags. This makes reassembly much easier, particularly when several doors look almost identical.
Protect your worktops, floors, appliances and surrounding walls with dust sheets and masking materials before moving on to preparation.
Step 2: Clean and Degrease the Kitchen Units
Cleaning is one of the most important stages of repainting kitchen units.
Kitchen cupboards collect grease, fingerprints, cooking residue and cleaning-product buildup. Even if a surface looks clean, a thin layer of contamination can interfere with paint adhesion.
Use a suitable degreaser or cleaning solution according to its instructions. Remove residue where required and allow the units to dry completely before continuing.
Do not assume sanding will remove the need for cleaning. Sanding a greasy surface can spread contamination around rather than solve the problem.
A clean, dry and properly prepared surface gives your chosen coating a better chance of adhering reliably.
Pay particular attention to corners, edges, areas around handles and surfaces close to cooking appliances. These locations can collect more grease than other parts of the kitchen.
Once cleaning is complete, inspect the surfaces under good lighting. If you can still see dirt, grease, loose coating or residue, deal with it before proceeding.
Step 3: Repair Chips, Cracks and Imperfections

Inspect each door and cabinet frame for scratches, dents, chips and damaged edges.
Small imperfections may be repaired using a suitable filler. Allow it to dry according to the product instructions, then sand the repaired areas until they blend with the surrounding surface.
If you are changing the handles, check whether the new hardware will cover the existing holes. You may need to fill old holes and prepare the surface before painting.
Do not expect paint to hide significant damage. Applying a thick coat over a deep scratch or dent is unlikely to produce a satisfactory result, and a fresh finish may make imperfections more noticeable.
Severely swollen boards, peeling laminate and structural damage need more attention before painting. In some cases, replacing the affected component may be more appropriate than applying a new coating.
Step 4: Sand the Kitchen Units
Sanding helps prepare the existing surface for the next stage of the painting process.
The objective is usually to reduce excessive gloss, smooth minor imperfections and create a suitable surface for the chosen primer or paint. You do not necessarily need to remove every trace of the existing finish.
The correct sanding method depends on the material and its condition. Previously painted glossy cupboards may need different preparation from unfinished timber, while thin veneers need careful handling to avoid damaging the decorative layer.
Use an appropriate sandpaper grit and follow the coating manufacturer’s recommendations. Work methodically rather than sanding aggressively.
Pay particular attention to edges and corners, where paint can accumulate and wear may become more noticeable.
After sanding, remove dust thoroughly. Fine particles left on the surface can become trapped beneath the coating and affect the final appearance.
If you discover loose or peeling paint, remove the unstable coating and prepare the area appropriately instead of simply painting over it.
Step 5: Apply the Right Primer
Primer can improve adhesion and coverage when it is appropriate for the surface and chosen paint system.
It may be particularly useful when painting laminate, melamine, stained wood or other surfaces where adhesion is a concern. However, not every cabinet paint requires a separate primer.
Some specialist products are designed to work without a separate primer on suitable surfaces. Others require a compatible primer to achieve the intended finish.
Before applying anything, check the manufacturer’s instructions for your specific products.
When primer is required, apply it evenly and allow it to dry for the recommended period. If the instructions permit sanding between coats, a light sanding may help smooth minor imperfections before applying the topcoat.
Avoid rushing this stage. A surface that feels dry may not always be ready for another coat.
Step 6: Choose the Best Paint for Kitchen Units
Kitchen cupboards need a coating suitable for frequent handling, cleaning and everyday wear.
Specialist cupboard paints, cabinet paints and suitable door and trim enamels are common options. Ordinary wall paint is generally not the first choice for a hard-wearing cabinet finish.
When comparing products, consider:
- Compatibility with your cabinet material
- Whether a separate primer is required
- Durability and resistance to everyday wear
- Recommended application methods
- Drying, recoating and curing times
- The finish and colour you want to achieve
Satin and semi-gloss finishes are popular choices because they can offer a practical balance between appearance and cleanability. Gloss finishes can create a striking look, although they may highlight surface imperfections.
Always choose products that are compatible with one another and follow their technical instructions.
Step 7: Paint the Cabinet Frames
Once preparation is complete, begin painting the cabinet frames.
Use a quality angled brush for corners, edges and detailed areas. A suitable mini roller can help create a more consistent finish on larger, flatter surfaces.
Work in manageable sections and avoid applying excessive amounts of paint. Thick coats can cause runs, drips and uneven coverage.
Use controlled strokes and avoid repeatedly brushing over areas where the paint has already started to dry. Depending on the product, the coating may level as it dries, so unnecessary touch-ups can create more visible marks.
Check the frames under good lighting to make sure you have covered the intended areas evenly.
Allow each coat to dry for the period specified by the manufacturer before applying another coat.
Step 8: Paint the Doors and Drawers
Cabinet doors are among the most visible parts of a kitchen, so take your time with this stage.
Where possible, place the removed doors on a clean, stable surface. Painting them horizontally can make it easier to control drips and runs, provided this is suitable for the chosen product.
Use a brush for recessed areas and detailed profiles, then a suitable roller for larger flat sections. If you are using a sprayer, make sure the surrounding area is properly masked and that ventilation and overspray controls are in place.
Avoid applying excessive paint along the edges. A heavy buildup can affect the way the doors fit when they are reinstalled.
Before painting every door, test your chosen method on one door or an inconspicuous area. Let it dry and inspect the finish under normal lighting. This gives you an opportunity to adjust your technique before completing the rest of the kitchen.
Brush vs Roller vs Paint Sprayer
Each application method has advantages.
- Brush: Useful for corners, narrow edges, and detailed profiles.
- Mini roller: A practical choice for flat surfaces and many DIY projects.
- Paint sprayer: Can produce a very smooth, uniform appearance when the equipment, preparation and technique are appropriate.
A brush and mini roller can be a good combination for homeowners who want to manage the project themselves. Spraying may be worth considering when a more uniform finish is the priority, but it requires suitable equipment, preparation and control.
The quality of the result depends on more than the application method. Surface preparation, compatible products and correct drying times remain important.
Step 9: Apply the Second Coat
Once the first coat has dried sufficiently, inspect the finish.
If the paint system calls for a second coat, apply it according to the manufacturer’s instructions. Two properly applied coats may provide more consistent coverage than trying to achieve complete coverage with one excessively thick coat.
If you notice minor roughness, check whether the product instructions permit light sanding between coats. Remove all dust before continuing.
Apply the next coat evenly and avoid repeatedly working over areas that have started to set.
Remember that paint can look different when wet compared with its final dried appearance. Allow the coating enough time to settle before judging the result.
Step 10: Allow the Paint to Cure Properly
One of the most important things to understand when repainting kitchen units is that dry to the touch does not necessarily mean fully cured.
A painted surface may feel dry but still need time to develop its intended hardness and resistance to everyday use.
From our experience, rushing this stage can undermine the work that has already gone into preparing and painting the cupboards. If doors are reinstalled too soon, closed tightly or put back into regular use before the coating is ready, scuffs, sticking, chips and marks may appear.
The same applies to placing items against freshly painted surfaces or cleaning them before the coating can withstand it.
Our advice is simple: do not rush the preparation, and do not rush the curing process. Use a suitable paint system, allow the recommended time between coats and follow the manufacturer’s instructions for when the cabinets can safely return to normal use.
Drying and curing times vary according to the product, temperature, humidity, ventilation and thickness of the coating. Avoid relying only on how the surface feels.
Keep the doors in a clean, protected location while they dry. Once the coating has reached the appropriate stage, reinstall the doors and hardware carefully and treat the finish gently during its early use.
Common Kitchen Cabinet Painting Mistakes
Several mistakes can affect the quality and durability of a painted kitchen.
Painting doors while they are still attached
Leaving doors in place can make it difficult to reach all edges and control the finish. Removing doors and drawers wherever practical makes the job easier to manage.
Skipping cleaning and preparation
Grease, dust and loose coatings can interfere with adhesion. Clean the surfaces properly, repair damage and prepare the existing finish before painting.
Skipping primer when it is required
Some cabinet paints are designed to be used without a separate primer, but others require a compatible primer for the particular surface. Check the instructions instead of assuming every product works the same way.
Applying excessively thick coats
Thick coats can cause runs, drips and uneven drying. Follow the recommended application method and number of coats.
Reinstalling doors too soon
A surface that feels dry may still be vulnerable to marks and sticking. Allow the coating to dry and cure according to the product instructions.
Rushing the entire project
Cleaning, repairs, sanding, priming and painting each take time. Trying to complete every stage too quickly can compromise the finish.
A successful kitchen repaint depends on the entire process, not just the paint you choose.
How to Get a Smooth Professional Finish
A smooth finish begins with good preparation.
Clean the units thoroughly, repair imperfections, sand appropriately and remove dust before applying primer or paint. Use suitable tools and avoid overloading your brush, roller or sprayer.
Good lighting can help you spot missed areas, drips and uneven coverage while you work. However, once you have applied an even coat, avoid repeatedly touching the surface as the paint begins to dry.
Follow the manufacturer’s guidance on application, recoating and curing. A compatible paint system applied correctly is generally more important than choosing a product based on price alone.
If you are using a sprayer, appropriate masking, ventilation and overspray control are essential. Professional-looking results require attention to preparation and working conditions as well as the equipment itself.
Best Colours for Repainting Kitchen Units
Choose a cabinet colour that works with the features you intend to keep, including your worktops, flooring, backsplash, walls and appliances.
White and off-white can create a bright, clean appearance. Grey can provide a contemporary look, while navy, green and muted blue can add more character.
Two-tone kitchens are another option. For example, you could use one colour on the base units and a lighter shade on the wall cabinets.
Before committing to a colour, test a sample in your kitchen. Natural daylight and artificial lighting can affect how a shade appears, so check it at different times of day.
The best colour is one that suits your space and preferences rather than simply following a trend.
How to Maintain Newly Painted Kitchen Units
Once your kitchen has been repainted and the coating is ready for normal use, gentle maintenance can help preserve its appearance.
Use a soft cloth or sponge with a cleaning solution suitable for the paint system. Avoid abrasive pads and harsh cleaning products unless the manufacturer specifically confirms they are appropriate.
Wipe away spills and cooking residue rather than allowing them to build up. Pay particular attention to areas around handles and cupboards close to cooking appliances.
Avoid slamming doors and deal with small chips or scratches promptly. Always follow the paint manufacturer’s advice on cleaning and maintenance, especially during the initial curing period.
DIY vs Professional Kitchen Unit Painting
DIY kitchen painting can be a worthwhile project if you have the time, patience, appropriate workspace, and confidence to prepare each surface carefully.
However, it can become demanding when a kitchen has many doors, detailed profiles, difficult laminate surfaces, or significant damage. Achieving a consistent finish across every door and frame also requires careful application and suitable drying conditions.
Professional kitchen spraying may be worth considering if you want a highly uniform finish, have limited time, or prefer to leave the preparation and application to an experienced team.
Before hiring a professional, ask how they prepare the units, which coating system they use, how they control dust and overspray, and how long the doors need to remain off the cabinets.
A good result is not simply about applying paint with a sprayer. Preparation, product compatibility, application, and curing all matter.
If you are considering professional help, Sprayed Tech Solutions can discuss your kitchen requirements and the options available for refreshing your existing units.
DIY vs Professional Kitchen Spraying: What’s Right for You?
Choosing between a DIY kitchen makeover and professional spraying comes down to your budget, available time, and expectations for the finished result.
Choose DIY Painting If:
- You want to keep the initial cost as low as possible.
- You have the time to prepare, prime, and paint the cabinets yourself.
- You’re comfortable using brushes and rollers and accepting some visible texture.
- You’re happy to complete the project in stages around your daily routine.
DIY painting can produce good results, but preparation is essential. Cleaning, sanding, priming where required, and allowing the coating to cure properly all make a difference to the final finish.
Choose Professional Kitchen Spraying If:
- You want a smooth, consistent finish with minimal brush or roller marks.
- You want to refresh your existing kitchen without the cost of a complete replacement.
- You prefer an experienced team to handle the preparation and application.
- You want to minimise the time and effort you personally spend on the project.
Professional spraying can deliver a more uniform, factory-style appearance when the surfaces are properly prepared and the correct coating system is used. The overall project time will depend on the kitchen’s size, condition, preparation requirements, and curing time.
Give Your Kitchen a Professional Finish with Sprayed Tech Solutions
If you’re happy to take on the preparation and painting yourself, this guide gives you a practical starting point. But if you want a more refined finish without managing the entire process, professional kitchen spraying is worth considering.
Sprayed Tech Solutions helps homeowners refresh tired kitchen units with a professionally applied finish, giving existing cabinets a new look without automatically replacing the whole kitchen.
Rather than spending weeks working through a DIY project in your spare time, let an experienced team assess your kitchen and explain the most suitable options.
Thinking about upgrading your kitchen? Contact Sprayed Tech Solutions to discuss your kitchen spraying project and find out how your existing units could be transformed.
Conclusion
Learning how to repaint kitchen units is about much more than choosing a new colour. The quality of the result depends on inspecting the cabinets, preparing the surfaces properly, selecting compatible products and allowing enough time for each stage.
Remove doors and hardware wherever practical, clean away grease, repair imperfections, sand appropriately and use primer when the chosen paint system requires it. Apply controlled coats and allow the coating to dry and cure before returning the cupboards to normal use.
As our kitchen painting advice highlights, two common mistakes are painting doors while they remain attached and rushing the preparation or curing process. Both can make it harder to achieve a smooth, durable finish.
If you have the time and patience, DIY painting can refresh a kitchen without replacing the existing units. If you want a more uniform finish or would prefer professional assistance, consider whether a specialist kitchen spraying service is right for your project.
Whatever route you choose, preparation and patience are essential to getting the best possible result from your kitchen makeover.
FAQs
Can I repaint kitchen units without sanding?
It depends on the existing surface and the paint system. Some specialist products allow reduced preparation on suitable surfaces, but glossy or smooth finishes may still require scuff-sanding or another manufacturer-approved preparation method.
What is the best paint for kitchen units?
A suitable cabinet, cupboard or door and trim paint is generally a better option than ordinary wall paint. Choose a product compatible with your cabinet material and follow the manufacturer’s instructions.
Do laminate kitchen units need primer?
Laminate surfaces can be difficult to paint because they are often smooth and non-porous. A suitable bonding primer may be required, depending on the surface and chosen paint system. Follow the product instructions and test the system first if necessary.
Should I remove kitchen doors before painting?
Removing doors and drawers wherever practical makes it easier to access the edges, prepare the surfaces and control the finish. It also provides a suitable opportunity to lay the doors flat for painting and drying when appropriate.
How many coats of paint do kitchen units need?
The correct number depends on the product, surface, colour and coverage. Follow the manufacturer’s recommendations rather than trying to achieve the result with excessively thick coats.
How long should painted kitchen units dry before reinstalling?
This depends on the coating, environmental conditions and manufacturer’s instructions. Dry to the touch does not necessarily mean fully cured. Allow the recommended time before reinstalling or returning the cabinets to heavy use.
Why does paint peel from kitchen cabinets?
Peeling can result from poor surface preparation, grease, dust, incompatible products, inadequate adhesion or other application problems. Proper cleaning, suitable sanding and the correct primer and paint system can help reduce these risks.