Skip to content
 Table of Contents
Spray painting is one of the easiest ways to refresh your home. Whether it’s giving your walls a new look, updating kitchen cabinets, or sprucing up furniture, using the right spray painting techniques can make your project smoother, faster, and more professional-looking.
Understanding how to use a sprayer, apply thin coats, and avoid common mistakes can save time and ensure long-lasting results.
This guide is designed for you to provide spray paint techniques, including how to get even coverage, handle tricky corners, and achieve a polished finish without the stress.
Why Do Right Spray Painting Techniques Matter?
Spray painting is more than just pointing and spraying. Even small mistakes like streaks, drips, or uneven coverage can make a freshly painted surface look messy. By learning a few simple spray painting techniques, you can:
- Get smooth, even coats on any surface
- Save time and avoid multiple touch-ups
- Reach tricky areas like corners, edges, and grooves
- Make your renovation look polished and professional
These techniques are particularly helpful when working on furniture, doors, cabinets, or small walls. Even if you’re new to spray painting, following these tips will make your project easier and more rewarding.
6 Top Spray Painting Tips for Home Projects
Choose the Right Sprayer
The first step is picking the right tool. For home renovations, you have two common options:
- Airless sprayers: Ideal for large areas like walls, fences, or cabinets. They cover quickly and provide even coats without leaving brush marks.
- Handheld spray cans: Perfect for smaller items like furniture, doors, or decorative pieces. Easy to handle and convenient for detailed work.
Choosing the right sprayer ensures smoother application and reduces the chances of mistakes, even for beginners.
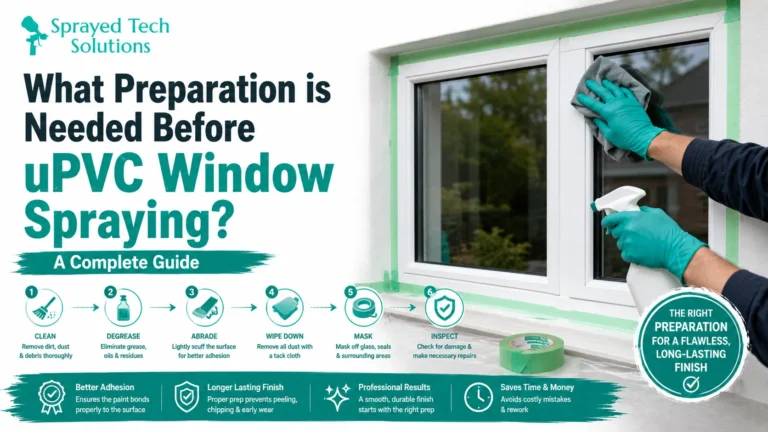
Prepare Your Surface Properly
Good preparation is key to a professional-looking result. Before you start spraying:
- Clean the surface to remove dirt, grease, or dust
- Sand rough areas to remove bumps or old paint
- Apply a primer for wood, metal, or darker colors to help the paint stick
Well-prepared surfaces allow paint to adhere evenly, reduce peeling, and make your finish last longer.
Use Smooth, Even Strokes
The way you move the sprayer makes a big difference. Keep these tips in mind:
- Hold the sprayer a steady distance from the surface (usually 6-12 inches)
- Move the sprayer in slow, even passes, maintaining a consistent speed
- Slightly overlap each pass to avoid gaps
- Apply multiple thin layers rather than a single thick coat
This approach prevents drips and streaks, ensuring a smooth, even finish that looks professional.
Handle Corners and Edges Carefully
Corners, trim, and edges can be tricky. Use these techniques:
- Angle the sprayer slightly to reach tight spaces
- Apply lighter coats on edges to prevent paint buildup
- Move slowly for even coverage
Attention to detail ensures the entire surface looks neat and finished.
Allow Proper Drying Time
Even if the paint looks dry, it still needs time to fully set. Drying time varies by surface and paint type:
- Thin coats: 15-30 minutes to touch dry
- Full curing: Several hours, depending on the material
Planning your project around drying time prevents smudges or damage to freshly painted areas.
Keep Things Safe
Safety is important, even for small home projects:
- Work in a well-ventilated area or outdoors
- Wear a mask to avoid inhaling fumes
- Cover floors, furniture, and surrounding areas to protect them from overspray
Safety precautions keep your project stress-free and mess-free.
Extra Tips for a Smooth Finish
- Test on a small area first to see how the paint behaves
- Hold the sprayer steady; avoid shaking or jittering it
- Apply multiple thin layers instead of one thick coat
- Avoid spray painting in high humidity or very cold conditions
Following these tips ensures your paint dries evenly and looks professional.
Spraying on Different Surfaces
Walls
For walls, use steady, overlapping passes. Start from the top and work your way down to avoid drips. Thin coats dry faster and allow you to correct mistakes easily.
Cabinets and Furniture
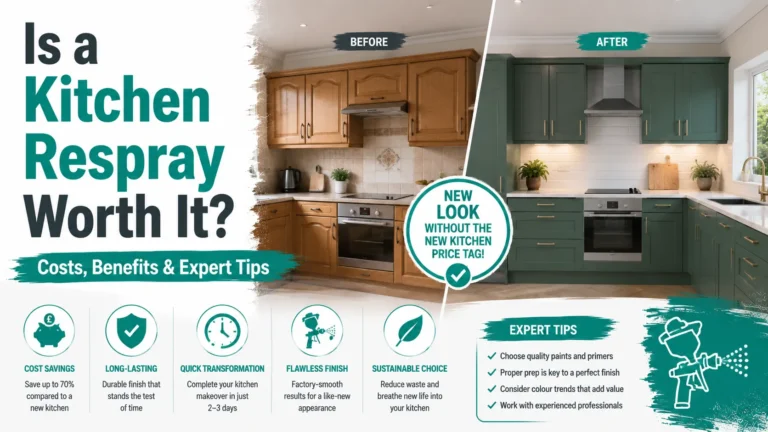
Use a hand sprayer or small airless sprayer for even coverage. Sand and prime wood surfaces before painting. Apply multiple thin coats for a smooth, durable finish.
Doors
Doors are best painted horizontally if possible to prevent drips. Edge and trim areas should be sprayed lightly, and drying time should be monitored to prevent sticking.
Decorative Pieces
Small items like picture frames or shelves require close attention. Hold the sprayer at the recommended distance and rotate the object if possible to get even coverage on all sides.
How to Save Time and Paint
- Apply multiple thin layers instead of a single thick coat
- Work in sections to avoid over-spraying or missing spots
- Use a consistent spraying speed and distance
- Cover unused areas with plastic or masking tape to prevent wastage
Following these simple strategies reduces paint waste, saves time, and gives a professional look even for home renovations.
Common Mistakes to Avoid
Even simple projects can go wrong if certain mistakes are made:
- Spraying too close: Leads to drips and thick spots
- Moving too fast: Causes uneven coverage or gaps
- Skipping surface prep: Paint may peel or flake
- Over-applying paint: Runs, streaks, and longer drying times
Avoiding these mistakes will make your spray painting results smooth, clean, and long-lasting.
Final Words
Using the right spray painting techniques can make your home renovation faster, easier, and more satisfying. By preparing surfaces properly, applying thin, even coats, and taking care with corners, edges, and drying times, anyone can achieve a smooth, polished look.
Whether you’re painting walls, cabinets, doors, or furniture, following these tips ensures your project looks neat, professional, and long-lasting, even if you’ve never sprayed paint before.
People also ask
Can I spray paint furniture at home?
Yes, furniture, doors, and decorative items can be spray-painted, but for the best results, professional spray-painting services are recommended. Our team ensures smooth, even coats, proper drying, and a durable, long-lasting finish that’s hard to achieve with DIY methods.
How far should I hold the sprayer from the surface?
Keep the sprayer about 6-12 inches away and move it steadily for even coverage.
How many coats should I apply?
Multiple thin coats are better than one thick coat. It prevents drips and helps the paint dry evenly.
Can I spray paint in a humid room?
High humidity slows drying and may affect the finish. Ensure good ventilation or wait for drier conditions.
How long should I wait before touching painted surfaces?
Thin coats usually feel dry in 15-30 minutes, but full curing can take several hours, depending on the surface and paint type.